As wartime shortages affected the supply of metals and other traditional materials for jewellery, designers turned to other materials including plastic, wood and textiles.
At the same time, the “make do and mend” home craft movement extended to jewellery, and 1940s magazines frequently featured ideas and patterns for DIY jewellery from available materials. Women were encouraged to improvise and make safety pin necklaces, crochet bracelets and felt flower brooches to add much-needed cheer to their increasingly tired wardrobes.
One product of the make do and mend jewellery trend is plastic ‘wire’-wrapped brooches. These are popularly attributed to factory girls using leftover electrical wire cuttings from the factory floor. However, the string is actually solid flexible plastic, not plastic-coated wire. At least one company, Jay Brand, manufactured and marketed “washable, hygienic, extra strong” plastic thread as a material for making “many attractive and useful articles” including jewellery and household items described in a promotional pamphlet they produced in the 1940s.
I love these colourful brooches but they’re becoming increasingly sought-after and pricey, so I decided to make my own. This tutorial is for a modified version which wraps the wire using a blanket stitch rather than crochet like the originals, so it requires no special equipment or skill.
While the original 1940s versions were not made with wire, I haven’t been able to source solid plastic thread, so mine use actual wire. Look for the finest gauge you can find (higher number = finer gauge - look for 30 AWG); and multi core is slightly more flexible than solid core. The wire I’m using in this tutorial is solid core with 1.5mm overall diameter.
To make a 1940s style make do and mend brooch you will need:
Fine gauge plastic coated wire in various colours (around 1m / 40” each of two colours to make this design; if you use thinner wire, you will need a longer length to get the same coverage) I used Velleman brand for this tutorial
Tie pin or safety pin
Metal O-ring or vintage curtain ring (mine are about 3cm internal diameter / 3.5cm external diameter)
Vintage button (floral designs work well, and I’ve also seen original examples using novelty shaped buttons)
Pliers (helpful for gripping, shaping and cutting the wire, but optional)

Step 1
Start by coiling your secondary or accent colour wire around the curtain ring. Leave a dangling ‘tail’ of wire, and make sure you wrap it so you’re bringing it over and through the ring as shown, or the coils won’t sit flat when you do the next step. Wrap it tightly at first, then when you’ve done about half the ring, space out the coils so the ends meet. Trim the wire, leaving a tail.


Step 2
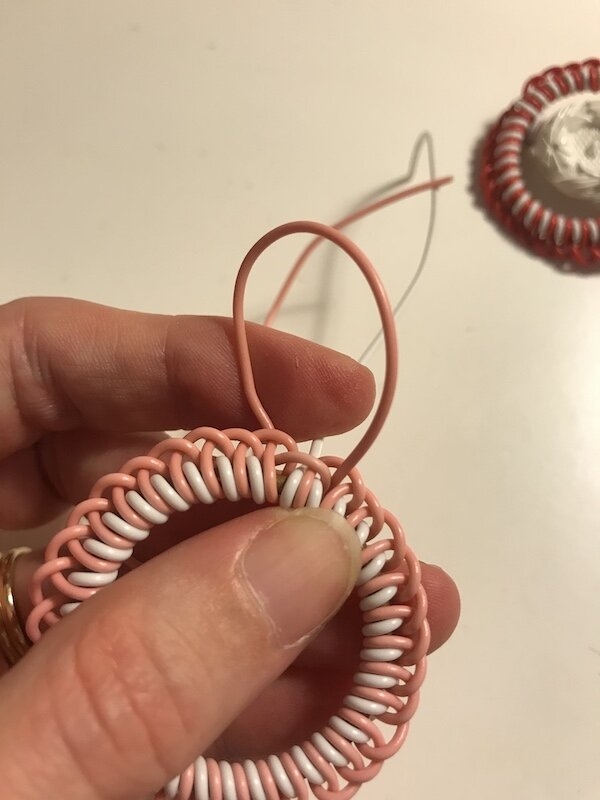
Take your primary colour wire and start to wrap it between the coils of the secondary colour, again leaving a tail of about 5”. Having wrapped the wire around the ring once, make a loop and feed the end of the wire through to create a knot. Take the end back through the ring and knot it again - you’re basically creating a blanket stitch with the wire, seating the coil neatly between the coil you made with the secondary colour. Pull the wire taut between each knot for a nice, even finish.


Step 3
When you’ve completed the full loop (you may need to unwind some of the secondary colour, or do a couple of extra wraps so the curtain ring is evenly covered), pull each end through the opposite loop to finish neatly.

Step 4
[Note: my tutorial differs from the original 1940s method slightly here, but after a bit of trial and error I found that it was easiest to construct the ring and then attach it to the tie pin, rather than integrating the process] Pull the ends through the stitching on the other side of the curtain ring to create a bar.


Step 5
Position the tie pin against the back of the bar you just created with the primary colour wire, open the pin, and wrap the secondary colour wire through and around to securely attach it, then continue coiling the wire around the tie pin. Halfway across, loop one of the wires through your button, then wrap the rest of the way, tie off securely and trim the tails. Attaching the button in this way ensures it stays centred within the ring and doesn’t slide around on the tie pin.


And voila, you now have your very own 1940s inspired “make do and mend” wire wrapped brooch! These are so satisfying to make, and the possibilities for different combinations of colours and embellishments are endless! You can also create different effects with variations on the basic technique: I created the black and white brooch starting with a double strand of wire black wire and then threading the white through afterwards. The red, white and blue brooch was made by threading a red wire through the loops created in the blue.
NB: this post contains affiliate links - purchasing through these links will help support Tuppence Ha’penny and enable me to keep producing content like this.